
- Newspaper or large plastic sheet/bag
- Bag
-Tape
- Acrylic paint
- Paint palette or mixing tool
- Paint brush
- X-acto knife
- Cutting board
- Printer
- Paper
- Sponge
- Sharpie
- Q-Tips
- Nail polish remover
- Blue Tack

Step 1
Prepare your workspace and lay out newspaper or a large sheet of plastic. You can use bin liners for this too. Make sure you cover a large space, you will be throwing paint so there is a possibility it will travel far and possibly stain object nearby.

Step 2
Tape any accents you don't want to cover in paint. In this case, there is chain detailing surrounding the bag that I don't want the paint to hit so I've taped it, front and back.

Step 3
Decide which colours to splatter across your chosen bag. I chose to do the same colours as the original but added the option of a blue. Mix this on a palette to get your desired shades. Make sure you mix enough to make a decent amount of splatters across the bag. The reason I have chosen acrylic paint instead of using nail polish like a lot of other DIYers have used is because acrylic is longer-lasting. Nail polish in renowned for chipping which means it will eventually chip and fade.

Step 4
Scoop a good amount of your chosen colour onto a spatula or a paint brush of your choice and throw it towards the bag in random directions making sure your the path of the throw does not reach past the covered area or you'll get red paint on your new cushion like I did! After you have finished, you must wait for the paint to dry fully before continuing, this may require you to wait overnight depending on how thick the paint splatters are.

Step 5
You can choose to paint your name free-hand if you're confident enough but if you're anything like me, it may be better to use a stencil. To do this, create a Word document and type your name in a large cursive font, I downloaded Learning Curve from DaFont.com, made it bold and printed it out landscape.

Step 6
Lay your printed name on top of a cutting board and using an x-acto knife, slowly cut out your name. Don't forget to cut out and keep the spaces inside letters, so the shapes within letter A's, E's, etc...

Step 7
Lightly tape the stencil cut out onto the bag and blue tack the letter cut outs in place. Mix the desired colour for your name and using a sponge, lightly dab the paint over the stencil evenly. Do about 2 or 3 layers of paint, leaving a few minutes to dry a little in between. On the last layer, make sure to do really light dabs to reduce the amount of bumps in the paint which is caused by the pores from the sponge.

Step 8
Take the stencil off and clean off the edges with a q-tip dipped in nail polish remover. Sharpen the edges with the use of a thin brush dipped in the same colour paint as the name. To sharpen the lines even further, use a black Sharpie and go around any rough edges.
Voila!
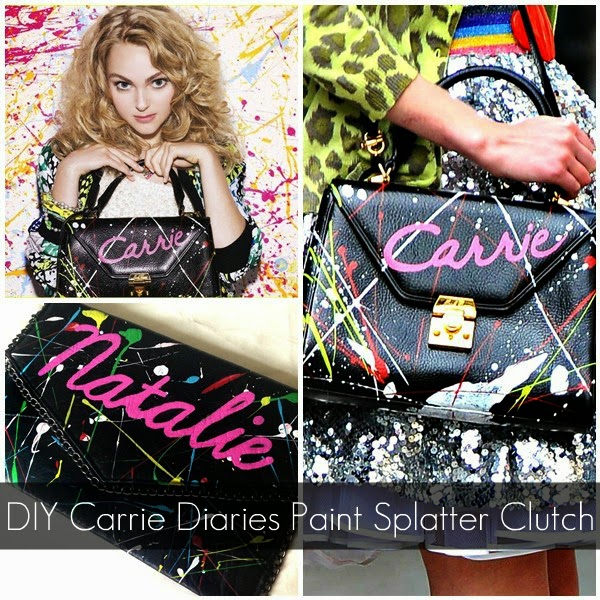
If you want to perfect this clutch even further, continue the pattern onto the back and under the flap. I absolutely adore this bag and I must admit, this is one of my greatest DIYs. This is a perfect way to upcycle and personalise and old bag and would make a fantastic present to someone who is a fan of Sex and The City and/or Carrie Diaries. Sadly, it has been announced that Carrie Diaries has been cancelled but be sure to keep the spin-off alive with this funky bag. There's no way of buying the actual bag from anywhere as it is a one-off piece created for the show but I have seen people selling versions on Etsy for $125! I think an at-home DIY is the way to go personally as this project only cost me £8.50. Check out the Oxfam shop for bags to customise here.

I hope you've enjoyed this DIY and again, I must apologise for my extended absence which was briefly explained in my Back To Basics blog post. I promise to get back into the swing of DIYing and already have two more projects planned so watch this space!


